Learn how to clean and lubricate a bike chain at home in 10 easy steps. Complete beginner-friendly guide with tools, best lubes, FAQs & tips to keep your bike running smooth and quiet!
Does your bicycle chain sound weird, feel gritty, or awkwardly shift? Cleaning and lubricating your bike chain at home is an essential skill for any cyclist. Proper maintenance of the bike chain will prolong the drivetrain’s life and its performance, whether it is a daily commuter, weekend warrior, or mountain biker, therefore ultimately saving you money on repairs. The following comprehensive master’s guide contains everything you need to know about cleaning and lubricating a bike chain without the need for a bike mechanic. This DIY tutorial is a beginner’s guide for novice riders and advanced riders, using only basic tools and household items. Following this procedure will guarantee your bike will work efficiently, reducing the wear on other expensive components such as cassettes and chainrings, while preventing potential costly breakdowns. The tools needed, safety precautions, detailed cleaning of the bike chain, lubrication procedures, and maintenance will be covered. Let’s get started and clean and oil your bike chain!
Check fast for the first news of Bikes & Cars launch on this WhatsApp channel
Why Clean and Lubricate Your Bike Chain Regularly?
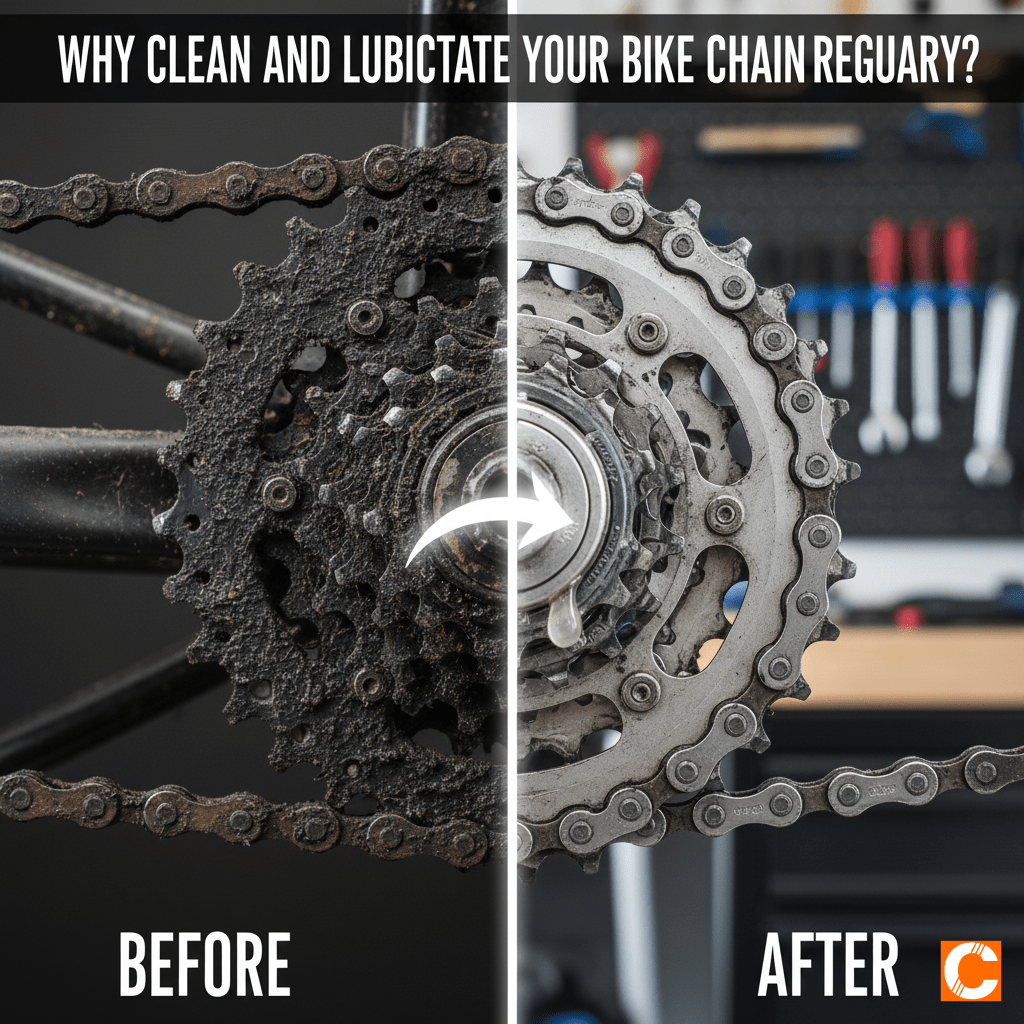
An important procedure that you should know how to perform is cleaning and lubricating your bicycle chain. All bike chains are usually the central figures or processes in your bicycle because they transmit the power generated by your pedaling to the wheel. In time, dirt, grime, road salt, and old lubricant have built up and ultimately caused friction, leading to premature wear. According to cycling experts, as much as 10 to 15% of bike efficiency can be lost through dirty chains, which make riding much harder and less enjoyable. Contaminants that accelerate corrosion and chain stretch are removed by cleaning, while grease minimizes friction and stabilizes parts from rust besides ensuring silent operation. For your regular road bike, every 200-300 miles is a couple of rides; after every muddy ride with a mountain bike. In fact, it can break your precious chain or damage some gears, literally transforming a fascinating hobby into an expensive hassle. Besides, having a clean bike at home reduces disposable waste from spare parts and promotes sustainability. SEO Tips on Searching: “Bike chain cleaning tips” or “best way to lubricate bike chain,” this guide has proven methods.
Tools and Materials You’ll Need
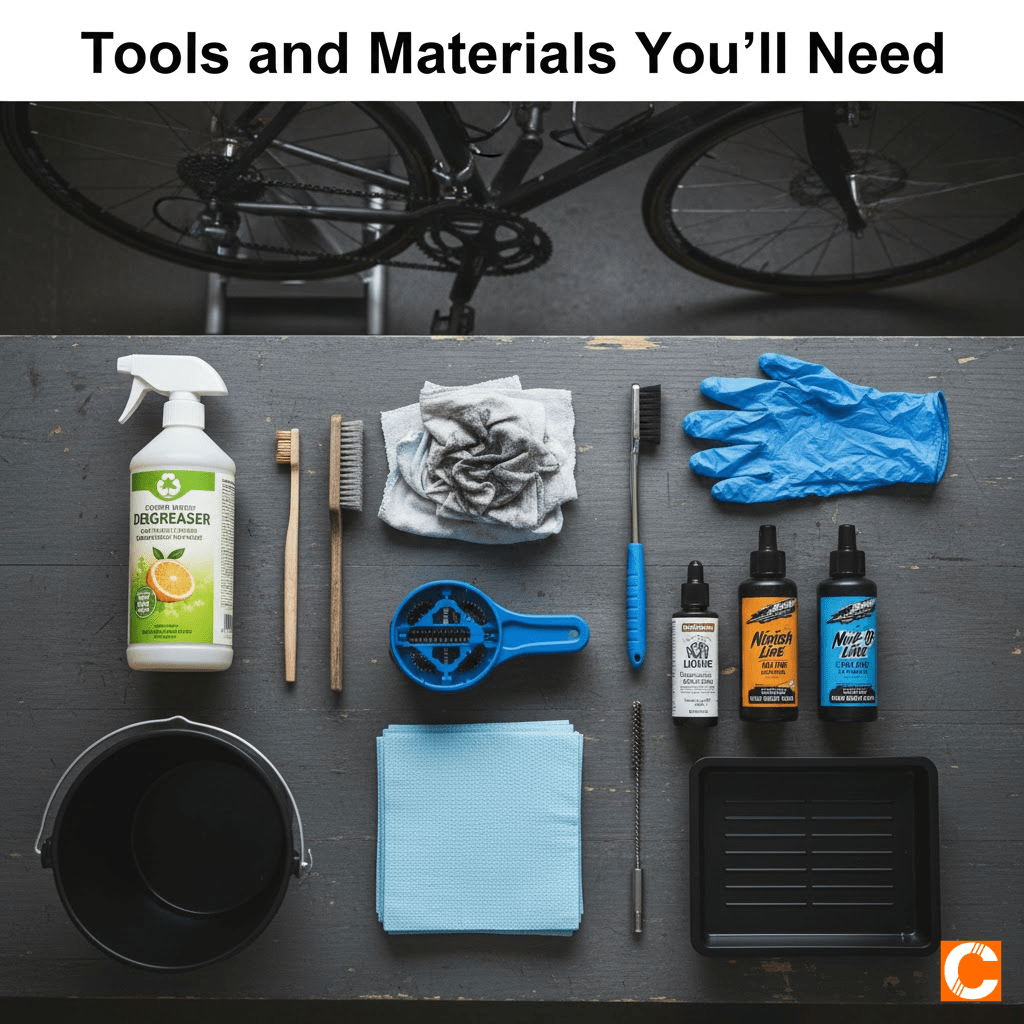
Gathering the right supplies is the first step in how to clean and lubricate a bike chain at home. Most items are affordable and available at bike shops, hardware stores, or online. Here’s a complete list:
- Degreaser: Citrus-based or bike-specific degreaser (e.g., Simple Green or Park Tool Bio ChainBrite) to break down grime.
- Chain Cleaner Tool: A plastic device with brushes that scrubs the chain while it’s on the bike (optional but highly recommended for efficiency).
- Brushes: Old toothbrush, chain brush, or bottle brush for detailed scrubbing.
- Rags or Paper Towels: Lint-free cloths for wiping.
- Bucket or Basin: For rinsing.
- Chain Lubricant: Wet lube for rainy conditions or dry lube for dusty environments (brands like Finish Line or Muc-Off work great).
- Gloves: Nitrile or latex to keep your hands clean.
- Bike Stand or Repair Stand: To elevate the bike (or flip it upside down if you don’t have one).
- Optional Extras: Chain wear tool (to check if your chain needs replacing), isopropyl alcohol for extra degreasing, and a drip tray to catch messes.
Budget-friendly tip: If you’re on a tight budget, use dish soap mixed with water as a mild degreaser, but avoid harsh chemicals that could damage seals.
Safety Note: Work in a well-ventilated area, wear eye protection if using sprays, and keep degreasers away from children and pets.
Step-by-Step Guide: Cleaning Your Bike Chain
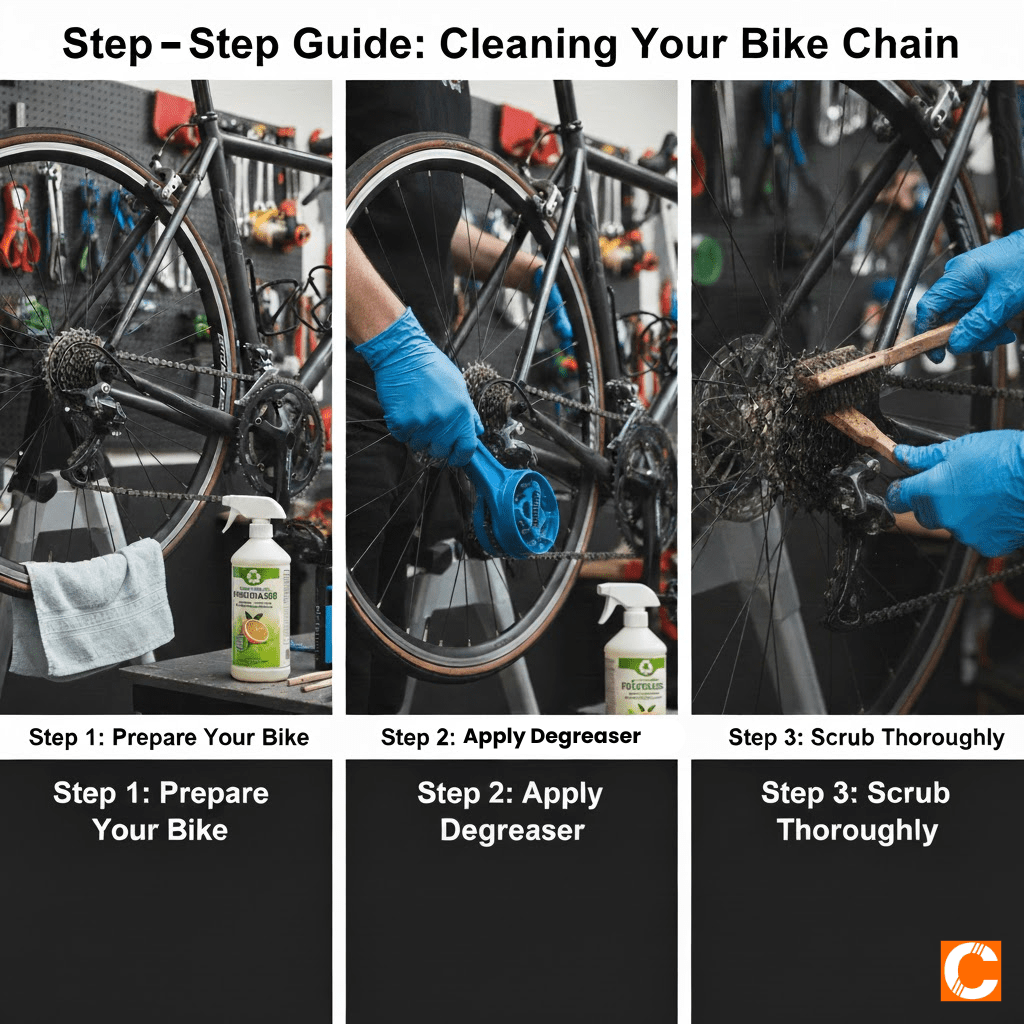
Now, let’s get to the core of how to clean a bike chain at home. This process takes about 30-45 minutes and should be done outdoors or in a garage to avoid indoor messes.
Step 1: Prepare Your Bike
Secure your bike in a stand or invert it on its handlebars and seat (protect surfaces with a towel). Shift to the smallest chainring and largest rear cog to slacken the chain for easier access. Remove the rear wheel if you’re comfortable— this allows full chain immersion but isn’t necessary for basic cleaning.
Step 2: Apply Degreaser
Shake your degreaser well and apply it generously to the chain. If using a chain cleaner tool, fill it with degreaser, clamp it onto the chain, and pedal backward 20-30 times. The brushes will agitate the grime. For a manual approach, spray or pour degreaser directly on the chain, focusing on links, rollers, and side plates. Let it sit for 5-10 minutes to penetrate.
Pro Tip: Rotate the pedals slowly while applying to cover all sections evenly. This is key for thorough bike chain cleaning at home.
Step 3: Scrub Thoroughly
Using your brushes, scrub the chain vigorously. Pay attention to the inner links where dirt hides. For stubborn buildup, use an old toothbrush dipped in degreaser to get into nooks. Also, clean the chainrings, cassette, and derailleur pulleys—these components interact with the chain and can re-contaminate it if ignored.If your chain is extremely dirty (e.g., after off-road riding), remove it with a chain tool or master link pliers for a deep soak in a bucket of degreaser solution. Agitate for 10 minutes, then rinse.
Step 4: Rinse and Dry
Rinse the chain with warm water from a hose or bucket. Avoid high-pressure washers, as they can force water into bearings. Wipe down with clean rags until no residue remains. Let the chain air dry completely— this might take 15-30 minutes. A dry chain is essential before lubrication to prevent emulsification.
Common Mistake: Skipping drying leads to diluted lube and poor performance. Use compressed air if available for faster results.
Step-by-Step Guide: Lubricating Your Bike Chain
Clean it, and all that remains would be lubricating your bike chain at home. Lubrication seals up by reducing the wear and repelling dirt.
Step 1: Select Proper Lube
Choose according to conditions: wet for wet weather-thick, sticky; dry for dry dusty rides-waxy, dry quick; and all weather for general versatility. Ceramic lubes produce top-level protection but come at a cost.
Step 2: Lubricate
By Hanging the bike in a stand, allow the back-pedaling to pull—-drop on every single link of that chain, not more than a single one, shrub over-alubing—-as would attract dirt. You should concern yourself with the inner chain where rollers, meet with pins.
Step 3: Work it in
Pedal backward for 20-30 times evenly spread the lube. Shift through gears so the whole drivetrain is buffered.
Step 4: Wipe Off Excess
After allowing it for about 5-10 minutes, wipe off the excess lube on a clean rag. This avoids dirt buildup. Your chain should feel slightly tacky and not oily. Expert tips: Use motor-compatible lubes on electric bikes or e-bikes to avoid electrical problems.
Common Mistakes to Avoid
Even professionals can falter while cleaning the bike chain. Don’t clean your chain too often; once a month is sufficient for an average rider. Never, ever apply WD-40 as lube; it’s a solvent, not a lubricant. Never use motor oil because it is too heavy and attracts dust. Using a chain-wear checker, should the chain stretch beyond the 0.5% mark, it must be replaced to avoid damaging other components.
Ongoing Bike Chain Maintenance Tips
To keep your chain in top shape:
- Wipe it down after every ride with a dry rag.
- Re-lube every 100-200 miles or after rain.
- Store your bike indoors to prevent rust.
- Inspect for damage like stiff links or rust spots.
- For winter riding, use salt-resistant lubes.
Incorporating these habits into your routine will make cleaning and lubricating a bike chain at home second nature, ensuring smoother, safer rides.
Conclusion: Ride Smoothly and Safely
Mastering how to clean and lubricate a bike chain at home empowers you to maintain your bike independently, saving time and money while enhancing your cycling experience. With the right tools and techniques outlined in this guide, you’ll avoid common pitfalls and enjoy a quieter, more efficient ride. Remember, consistency is key—schedule regular maintenance to prolong your bike’s life. If you’re new to cycling, start small and build confidence. For advanced tips, consider joining local bike clubs or forums. Happy riding, and keep those chains clean!
Frequently Ask Questions
1. How often should I clean and lubricate my bike chain?
It depends on your riding conditions:
Road/commuter bikes (dry weather): Clean every 300–500 km (200–300 miles) and re-lube every 150–250 km or after getting wet.
Mountain bikes or wet/muddy conditions: Clean after every muddy ride and re-lube every 100–150 km or after rain.
Quick rule: If the chain looks black, feels gritty, or starts squeaking — it’s time to clean and lube.
2. Can I use WD-40 to lubricate my bike chain?
No — never use WD-40 as chain lubricant. WD-40 is a water displacer and light solvent, not a proper lubricant. It will clean the chain temporarily but evaporates quickly and leaves the chain dry and unprotected, causing faster wear. Use a dedicated bike chain lube (wet, dry, or all-conditions) instead.
3. What’s better: wet lube or dry lube?
Wet lube (e.g., Finish Line Wet, Squirt Long Lasting): Best for rainy, wet, or winter riding. It’s thick, sticky, and lasts longer but attracts more dirt.
Dry lube (e.g., Squirt Dry, Muc-Off Dry, White Lightning): Ideal for dry, dusty conditions. It goes on wet, dries to a waxy coating, and stays cleaner but washes off easily in rain.
Choose based on your local weather — most riders keep both and switch seasonally.
4. Do I need to remove the chain to clean it properly?
No, you don’t have to remove it in 95% of cases. An on-bike chain cleaner tool (like Park Tool CM-5.3 or Finish Line Chain Cleaner) with degreaser does an excellent job in 5 minutes. Only remove the chain if:
* It’s extremely caked with mud/clay
* You have a quick-link or master link and want to soak it in a jar of degreaser for a deep clean (great for very dirty MTB chains).
5. How do I know when my bike chain needs replacing (not just cleaning)?
Use a chain wear tool (e.g., Park Tool CC-4 or a cheap £5 chain checker). If wear is 0.5% or less → Chain is good, just clean and lube.
0.5–0.75% → Replace soon to avoid damaging cassette/chainrings.
Over 0.75% → Replace the chain immediately (and likely the cassette too).
A worn chain shifts poorly, makes noise, and dramatically speeds up wear on expensive parts.
Also Read:
Maruti Grand Vitara Recall 2025: 39,506 Units Pulled Back – Shocking Fuel Gauge Fault Exposed!